


MyCourses: Accessibility

In short
- Build an accessible MyCourses workspace: Step-by-step guide
- Make learning materials accessible: Checklist for teachers
- Check your own workspace's accessibility
- Enable ReadSpeaker for students to listen to course content
1. Designing an Accessible Course: Step-by-step guide
-
Course Structure and Content Clarity
- Organize sections/modules logically (e.g., by week or theme) and give them descriptive names.
- Give every activity and resource a descriptive, unique title.
-
Avoid long text blocks; use short paragraphs and lists. Avoid excessive formatting (e.g., ALL CAPS, underlining, or italics).
-
Technical Accessibility of Text
- Use structured heading styles (e.g., H1, H2, H3) to create hierarchy. They help screen readers and other assistive tools interpret content correctly. Do not skip heading levels (e.g., from H1 to H3), and do not create headings by manually changing font size or bolding text.
-
Use descriptive link text instead of bare URLs. Avoid vague phrases like “click here.” The purpose of the link should be clear from the link text alone.
-
Image Accessibility
- Avoid presenting essential text/information as an image only.
- Add alternative text (alt text) that describes the image’s content and purpose. If the image is purely decorative, mark it as decorative.
- How to add alt text in MyCourses:
- Click the “Insert image” icon.
- Choose the image file in the file picker.
-
Add the alternative text in the field “Describe this image to someone who cannot see it,” or mark the image as decorative. Save changes.
-
Video and Audio Content
- Add captions to all videos. Review and edit automatic captions in Panopto: Editing captions in Panopto videos.
- Provide a text version (transcript or summary, also know as a text alternative) of audio content. This is also necessary if speech—and therefore captions—does not cover important visual information shown in the video.
-
Colors and Contrast
- Use color combinations with sufficient contrast, such as black text on a white background.
- You can check color contrast using the WebAIM Contrast Checker.
- Do not rely solely on color to convey information. Use shapes, patterns, or headings to improve readability.
-
Accessible Documents
-
Ensure that all Word, PowerPoint, and PDF files are accessible before publishing: Checklist for the accessibility of learning material and digital content | Aalto University
-
-
Exams and assignments
- Provide clear instructions and assessment criteria; state duration, deadlines, and submission format.
- Allow audio or video submissions when appropriate for the learning objective.
- Accommodate individual arrangements using user overrides (extra time, extended availability, number of attempts).
- Ensure the accessibility of visual elements and attachments used in assessments: Checklist for the accessibility of learning material and digital content | Aalto University
-
Avoid question types that require mouse usage (e.g., drag & drop) and be prepared to offer an alternative method.
-
Multilingual content
- Keep headings and terminology consistent across languages; avoid mixing languages within the same sentence or paragraph.
-
Mark language version of content with Mlang tags; avoid displaying multiple languages at the same time.
-
Use accessibility checkers
- Analyze your course with the MyCourses Accessibility Checker (Brickfield) to identify issues.
- When creating learning materials, use the built-in accessibility checkers in the authoring tools (e.g., Word, PowerPoint, Panopto).
2. Accessible learning material
Checklist for the accessibility of learning material and digital content
This site provides you with a comprehensive checklist to help you ensure that your learning materials are accessible to all students.

3. Accessibility Review
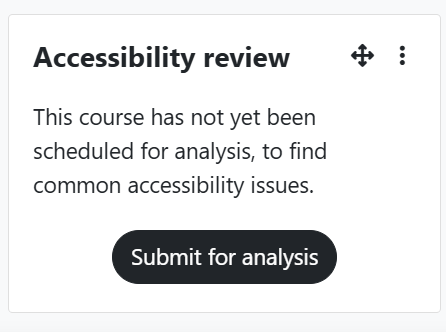
The accessibility Review tool provides information about the accessibility of your course area. The tool’s analysis shows which parts of the course area are problematic in terms of accessibility
Enabling the accessibility tool in a MyCourses workspace
- Open the course workspace and turn editing on.
- In the right-hand menu, open Blocks.
- In Add a block, select Accessibility review.
- The block will appear in the right-hand menu.
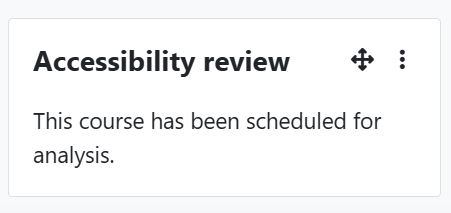
- Start the accessibility analysis by clicking the Submit for analysis button. You will see the notification:
This course has been scheduled for analysis. It will take a few minutes to complete. You do not need to stay on this page while waiting for the results. Students cannot see the results. - Once the review has been completed, you can update the course structure and content based on the accessibility results. The accessibility review is updated automatically. You do not need to refresh or remove it.
Interpreting the results
When the review is complete, you can a summary of the results in the block. More detailed error list can be opened from the magnifying glass button (Icon no. 1 in picture below). The error list includes direct links to edit each activity. You may also view result in different ways:
- Results based on activies and content types: The charts are available via the magnifying glass button (Icon no. 1 in picture below)
- A heatmap that shows in which course sections there are accessibility issues. You can show or hide the map using the eye button (Icon no. 2 in picture below) in the block
- A PDF summary of accessibility issues. Download the summary using the download button (Icon no. 3 in picture below)

Typical errors and how to fix them
| Error type | What does the error mean? | How to fix this? |
|---|---|---|
| Images | The image is missing alt text. | Add descriptive alt text or mark the image as decorative. |
| Page layout | Headings are not marked with heading styles, the heading hierarchy jumps, or the page is very long. | Use H1–H3 heading styles in a logical order. Consider splitting a very long page into shorter ones. |
| Links | The link opens in a new window without warning. The link text does not indicate where the link leads (e.g. it is just a URL). | Prefer opening links in the same window. If you open in a new window, indicate this near the link. Write descriptive link text (e.g. “Aalto accessibility guidelines” instead of a raw URL). |
| Media | The video has no subtitles. | Add subtitles or a short text description. |
| Tables | The table is missing header cells or the structure is unclear. | Add a header row and columns, and avoid merged cells. |
| Text | The contrast between text and background is weak. Bold/italic is not marked semantically. | Increase contrast (e.g. dark text on a light background). Remove formatting and reapply it in an accessible way. |
Read more: Accessibility toolkit in Moodle
4. ReadSpeaker and DocReader in a MyCourses workspace
ReadSpeaker helps students listen to text on MyCourses pages and to documents uploaded to a course workspace. It supports accessibility, different ways of learning, and flexible studying.
ReadSpeaker can be especially useful in courses with a lot of reading material, long instructions, articles, lecture slides, or other text-heavy resources. It can also support students who experience challenges with reading, concentration, or understanding the language of the material.
ReadSpeaker features in MyCourses
In MyCourses, ReadSpeaker includes two features:
- WebReader reads the text content on MyCourses pages.
- DocReader opens and reads documents uploaded to MyCourses.
When the teacher adds the ReadSpeaker block to the workspace, both WebReader and DocReader become available to students.
The Aalto licence includes three reading languages: Finnish, Swedish, and English. The teacher can select the default reading language, and students can change the reading language during use.
Enable ReadSpeaker in the workspace
ReadSpeaker is not enabled by default in a course workspace. The teacher enables it by adding the ReadSpeaker block to the workspace.
- Open the MyCourses workspace.
- Turn Edit mode on.
- Open Blocks from the menu on the right.
- Select Add a block.
- Select ReadSpeaker webReader from the list.
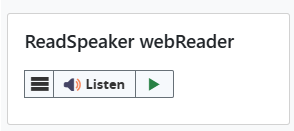
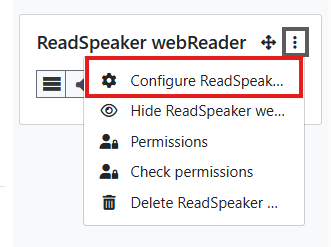
- Open the settings of the added ReadSpeaker block (Figure 1) from the three-dot menu > Configure ReadSpeaker (Figure 2).
- Select the default reading language: English, Finnish, or Swedish.
- Under Where this block appears, select Display on page types: Any page. This means that the block will be visible on all pages in the workspace.
- Save the changes.
ReadSpeaker is now enabled in the workspace. When the block is visible on all course pages, students can use it in different parts of the workspace.
How students use WebReader
With WebReader, students can listen to the text content on MyCourses pages.
- Find ReadSpeaker form the right-hand block drawer and select Listen if you want to listen to the content of the page.
- Highlight the text you want if you only want to listen to a specific part of the page. After selecting text, a menu appears where you can start listening.
- You can change the reading language during use if needed.
WebReader tries to identify and read the main text content of the page. It may not be able to read all menus, buttons, images, embedded content, or other page elements.
How students use DocReader
With DocReader, students can open and listen to documents uploaded to MyCourses in the browser.
- Go to the document in the MyCourses workspace.
- Click the ReadSpeaker icon next to the document (Figure 3).
- The document opens in DocReader.
- Start listening and adjust the reading speed or reading language if needed.
DocReader can be useful for listening to PDF articles, lecture slides, Word documents, assignments, and other text-heavy files. It may also provide text highlighting, dictionary, and translation features, if available.
DocReader supports common file formats, such as PDF, Word, PowerPoint, Excel, OpenDocument, and EPUB files.
Read more