


MyCourses: Quiz activity

In short
Quiz activity:
- A versatile questioning tool that includes a variety of question types. Answers to questions are mainly checked automatically, but some (like essays) are manually graded.
- Serves as an effective means of assessing students' knowledge and understanding of course topics during and at the end of the course.
- Allows students to practice, self-assess, and test their knowledge.
- Can be scheduled for a specific time, enabling planned practice and assessment for students.
- Includes reporting tools that can help identify and address learning issues.
Quiz
The quiz is a versatile survey tool that allows you to test students' skill development during and at the end of a course. The quiz includes a wide range of question types, such as multiple-choice, matching, true-false, embedded answers, numerical, and essay questions.
The quiz also contains calculated questions that can use varying numerical initial values, as well as Stack tasks. Note that calculated questions only check the numerical value provided by the student. Use Stack if you want to review intermediate steps.
Creating a quiz involves a two-step process: first, set up the quiz activity, and then add questions by either creating them from scratch or selecting them from the Question bank.
You can upload large sets of questions to the Question bank, from which you can select or randomly sample different questions. It's recommended to organize questions in the question bank into categories, which simplifies adding questions from various topics and levels.
You can utilise Turnitin for plagiarism detection in the quiz. You can also add a password to the quiz.
You can shuffle questions and answer options. You can provide students with feedback on their answers, which can be either immediate or delayed. Always use delayed feedback in conjunction with exams.
You can use Safe Exam Browser (SEB), which means that all other functions of the computer can be disabled during the exam. SEB is useful for supervised classroom exams or exams held in Exam rooms.
Read more:
Creating a quiz
There are plenty of settings in a quiz that affect its functionality.
Step-by-step instructions can be found at Moodle.org: Quiz settings.
Pay particular attention to the following settings:
- Timing: Define the opening time, the closing time, and, if desired, the time limit. The time limit refers to the amount of time allotted to each student to complete the quiz. In other words, you can mark that the quiz takes place from 12-3 pm, but the completion time is 2 hours. This way, there is no pressure for everyone to start and finish at the same time, and, e.g., technical challenges can be resolved without tight time pressure.
- Review options:
The table consists of four columns that dictate when students can view certain aspects of their attempt. In practice, correct answers might be displayed during or immediately following the attempt. However, it is generally preferable to wait until the quiz is closed before revealing the correct answers. - The table can also mark when feedback, points, or maximum points (marks) are visible to students.
- You can use Safe Exam Browser (SEB), which means that all other computer functions are closed during the quiz. SEB is useful in supervised classroom quizzes or quizzes conducted in Exam rooms.
- You can edit the quiz task completion time for individual users: in the Quiz page, open the More tab and select the Overrides. Click Add user override button, select a user, and define their completion time. The completion time can vary in date, time, or length from the quiz settings. Different users may have different completion times. A user with an exception time can access the quiz at their designated time, eliminating the need to modify or create a separate activity for other quiz settings.
Read more about:
Adding questions
Step-by-step instructions can be found atMoodle.org: Building Quiz.
If you create new questions, the recommended way is to first add the questions to the Question Bank. If necessary, create categories for the questions to facilitate question management.
- Open the Question bank from the Main course page navigation’s More menu. Open the Question bank menu’s Questions and create new questions. You can add a category from the same menu. Choose which course name or category to bind it under from the menu.
OR - Add questions directly in the Quiz. Open Quiz and the Questions tab. Add a new question, or you can add questions from the Question bank and import them from there.
OR - Import questions as an XML file to the question bank. Note that you can create questions with the help of the AI Assistant! Guidance for this can be found further below.
Note: You cannot add or remove questions if the quiz has already been answered.
You can test the functionality of the quiz by previewing it through the Preview quiz button. Check that all questions and settings work as expected. Note that tests conducted in the teacher role don´t appear in the results.
Question bank and adding random questions
You can create categories in the Question bank, from which questions are added for quizzes. You can select questions randomly from categories, ensuring that each respondent receives a unique set of questions, rather than all quiz takers having the same ones. Ensure that the questions in a category are similar in scope and difficulty.
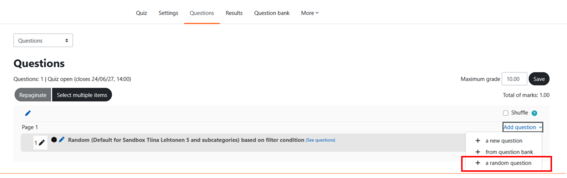
Adding random questions step-by-step:
- Open the quiz and the Questions tab.
- Click Add question on the right side and select a random question.
- Select the category from which to select the questions and click Apply filters.
- Choose how many questions to add from the category.
- You can add questions from multiple categories.
Read more:

Results and giving feedback
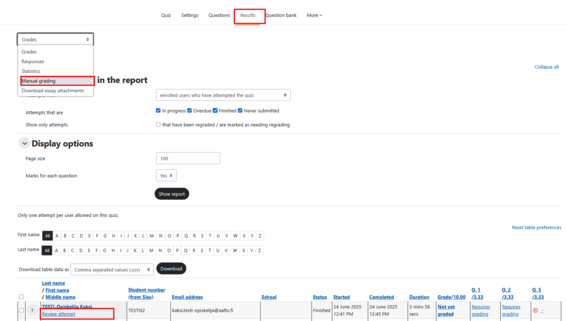
- Reviewing results:
- When students have taken the quiz, you can review their attempts from the Results tab.
- You can view results per student by selecting Review attempt under the student's name or
- From the drop-down menu on the Results page under Responses.
- Feedback and assessment:
- You can provide feedback to students by question or as a whole. When you use correct answers in your questions, grading becomes significantly faster or entirely automatic.
- Sometimes it may be necessary to review responses (like essays) manually. This can be done from the Results tabdrop-down menu, on the Manual grading page.
Examples and video instructions
- MyCourses guide Tutorial on electronic exercises and exams in MyCourses (Moodle)
created by Panu Erästö and Jan-Mikael Rybicki (In finnish.) - MyCourses workspace: Quiz example created by Panu Erästö. (Join the workspace as a student.)
- MyCourses workspace: MyMathematics - Mathematical exercises in MyCourses (Join the workspace as a student.) (In finnish.)
Video instructions
Video instructions: Exam basics: Setting up a simple exam, Luis Costa
Video instructions https://wiki.aalto.fi/display/mchelp/Quizzes