


MyCourses: Grading

In short
- Primarily, use MyCourses for grading to ensure transparency.
- Whenever possible, utilize MyCourses as a tool for calculating the course total grade.
- You can adjust the grading for calculating the course total grade.
- In MyCourses, you can create empty grading items in the gradebook for tasks done elsewhere (such as a traditional exam), so they can be included in the calculation of the course total grade.
- You can transfer the course total grade, credit points, language of completion, and date of completion to Sisu via a CSV file.
Recommended assessment practices
As a general rule, all grades should be saved in MyCourses under the Grades section. Ensure that activities assessed externally are also documented in MyCourses. It is recommended to use the course workspace for the tool that calculates the course's final grade as well.
The assssment process must be transparent to students and accessible to all other teachers in the course, including teachers who will act as responsible teachers in the future. If you use specific assessment formulas or methods, they should be made visible and understandable to the other course teachers. If you use alternative software for grading, such as Excel, it is recommended to add the documents to the course workspace and restrict their visibility to the course teachers.
Present the assessment criteria clearly on the course Syllabus and communicate them to students at the beginning of the course. Also, make information on possible retake exams visible in the course workspace.
Note! Do not store grading data on your own computer. Once you have saved the grading data in MyCourses or Sisu, immediately delete any files that contain student data and grades to ensure the security and privacy of student information.
Course total grade
MyCourses calculates the course's total grade based on the graded activities (i.e. grading items) and the course total grading settings. Aalto University uses grading scales 0-5 and Passed/Failed. You can modify the overall course grade calculation to correspond to these scales.
By default, MyCourses calculates the overall course grade using the natural sum, i.e. the sum of all grades. The maximum overall course grade in the natural sum is the sum of the maximum points of all assessment items.
The course total grade column shows the combined result of all graded tasks in the course. In the final column of the grader report, Course total, the overall course grade is automatically calculated and displayed based on your settings. During the course, temporary values are shown in the overall course total until all grades are available. For this reason, it is recommended to hide the course total grade column from students until the final grade is fully formed.
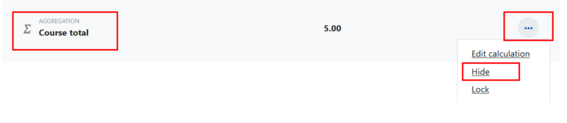
Hiding the Course total grade
On the Main course page, open Grades in navigation. Turn on editing mode, click the three dots next to the Course total column, and select Hide. The eye icon will change to a crossed-out eye, and the column heading will turn grey, indicating that the overall grade is not visible to students.
Hiding the entire gradebook
In the grader report view, turn on editing mode, click the three dots on the topmost row corresponding to the course name and select hide. This will make all assessment items grey and the eye icon will change to a crossed-out eye.
Watch the video Moodle.docs: introduction to assessment

Overall grade settings
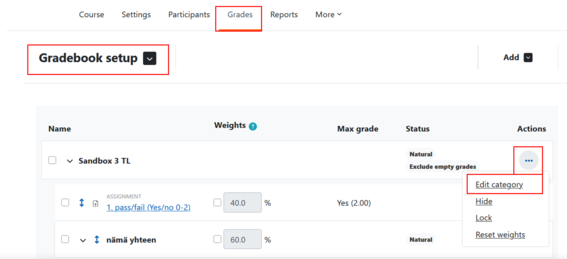
You can find the overall grade settings by selecting Grades tab -> from the dropdown menu Gradebook setup → Select Edit category from the three dots in the first row of the table under the course name.
You can choose different aggregation of grade calculation for the overall grade. You can find more information about the method in the question mark area.
- natural sum
- mean of grades
- weighted mean of grades
- simple weighted mean of grades
- mean of grades (with extra points)
- median of grades
- lowest grade
- highest grade
- mode of grades
Read more Moodle.org: Grade aggregation
Read more Moodle.org: Grades
Converting the overall course grade to 0-5 points (in Sisu-compatible form)
Method 1: 0-5 as simple points
This model uses an evenly spaced grading scale, where grade 1 is 20% of the maximum, grade 2 is 40% of the maximum, etc.
- Grades -> select Gradebook setup from the dropdown menu -> select Edit category from the three dots next to the course name.
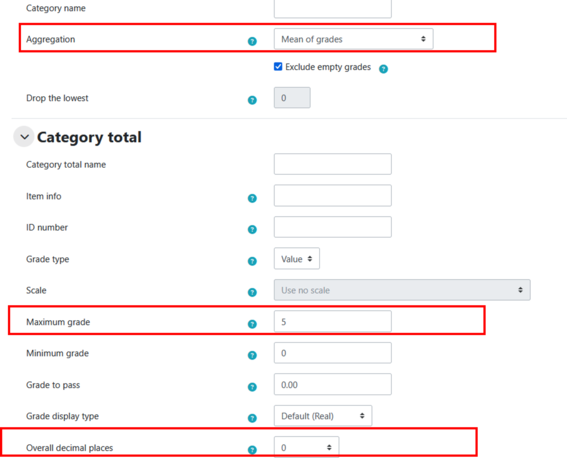
- Choose the grading method "Mean of grades", "Weighted mean of grades" or "Simple weighted mean of grades" according to how you want the calculation to be done.
- Keep the Grading type as "Value" and change the maximum grade to 5. The minimum grade should be 0.
- Click Show more and set Decimals shown to 0. You will get the overall course grade as whole numbers.

Method 2: modifying grade boundaries
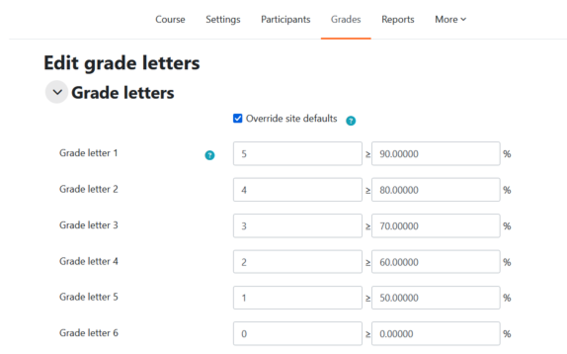
In this model, grade distribution is defined by yourself, for example you want to use a 0-5 grading scale where 0 means fail and 1 corresponds to at least 50% of the course's total grade. Use grade letters.
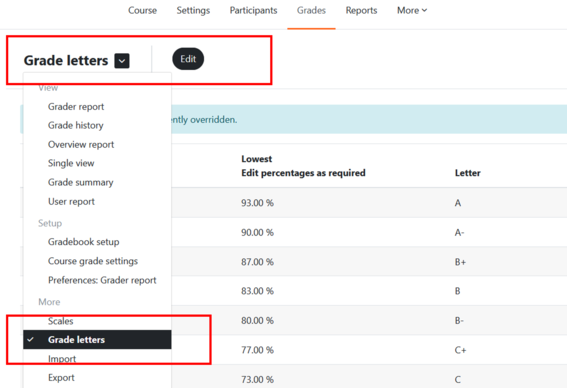
- Select Grade scale grade from the dropdown menu under Grades and click Edit.
- Select Override site defaults to customise the grade range and enter the desired percentages for each grade letter. In this example, 0 corresponds to 0-49%, 1 corresponds to 50-59%, and so on. When you are done, click Save changes.
- Next, change the grade display so that students see the grades as grade letters. You can do it as follows:
- Grades dropdown menu → Gradebook setup → Click the three dots next to the course name in the top row of the table Edit category → Select Show more at the bottom of the window → Under the heading Category total choose Grade display type to select Letter, Letter (percentage) or Letter (real) → Save changes.
- Return to the Grade report and check that the grades are displayed correctly. Letterdisplays only the grade, Letter (real) displays the grade and score and Letter (percentage) displays the grade and percentage score.
- When exporting grades according to the grade scale to Sisu as a csv file, select Letter rather than Real in the Export file settings. More information on Sisu export file can be found in the Export results to Sisu.

Method 3: Using formulas
MyCourses enables the creation of custom calculations. Formulas should be used in situations where the evaluation methods defined by MyCourses, the use of categories or changes to the grading scale do not suit your assessment strategy.
When using formulas, keep in mind that all identification numbers marked in the formula [[x]] must be defined as values or points. DO NOT USE scales or letters in any category or task referred to in the formula with these identification numbers.
To create a formula, first go to the total grade of the relevant category or course on the Gradebook settings page. On the course total of the course or category, select Edit calculation from the three dots. The calculation method for the total grade of the course is changed on the last line of the table at Aggregation method, Course total.
After this, an empty field opens where you can enter your formula. Before entering the formula, assign id-numbers to all activities or categories you refer to in the calculation. Names placed in double square brackets, such as [[Exam]], act as identification numbers that MyCourses interprets as values.
Example 1: A formula that converts grades from a 0-100 scale to a 0-5 scale that you can use to calculate the total course or category grade:
=if(([[E]])>=90, 5, if(([[E]])>=80, 4, if(([[E]])>=70, 3, if(([[E]])>=60, 2, if(([[E]])>=50, 1, 0)))))
This formula states that if the exam result is 90 or higher, the student is given a grade of 5. Similarly, if the result exceeds 80, it is given as 4, and so on, progressing to the final stage. Here, if none of the defined conditions are met, the formula returns a value of 0. In other words, if the result is less than 50, the student does not pass the exam. The scale used here is just an example, and you can of course set your own values.
Example 2: Quiz task where points range from zero to ten (0-10). You want to adjust so that the grade is “0” if the result is less than “5”. If the grade is between “5” and “10”, the points corresponds to the grade.
Solution: Use the formula "=if([[quiz]] <5, 0, [[quiz]])"
Example 3: A formula that changes all points between 0 and 4 to a grade of 0 (fail) and all points between 5 and 10 to a grade of 1 (pass).
Solution: Use the formula "=if([[quiz]] >= 5, 1, 0)", and remember to set the aggregation method to a SISU-compatible scale such as "Pass/Fail", so MyCourses interprets the scales as a value of 1=pass, 0=fail.
Example 4: A formula that converts points from 0-10 to grades 0-5 (1, 1.5, 2, 2.5, ... 5) rounding to one decimal place.
Solution 3: Use the formula "=round(([[quiz]]*0.5), 1)" | To round the result to an integer (1, 2, 3, 4, 5), use the formula "=round(([[quiz]]*0.5), 0)"
Read more Moodle.docs: Grade calculation
Adding a grade item to the gradebook
In the course space all activities with grading will automatically be included in the grading view. Importing grades means that assignments can be assessed outside MyCourses. Typically presentation, paper exam or field task is assessed outside MyCourses but grade is brought into MyCourses either manually or by importing a CSV file.
It is recommended to keep all grades in MyCourses. This facilitates the calculation of the overall course grade. It also makes the grades more easily accessible and transparent for students.
Grades can be imported into MyCourses in two ways: manually and by importing (CSV file). In both cases, add a column (new grading item) to the assessment.
- Select Gradebook setup from the drop-down menu on the grade page.
- At the top of the page there is a section Add -> Add grade item.
- Enter a name for the item, maximum grade and possibly minimum grade -> Save.
- The item will appear as a new column on the grader report.
- Turn editing mode on from the upper right corner. Boxes will appear on the grader report where the grades can be entered. Save changes.

Importing grades by pasting from a table
- First create an empty grading item into the course space grading table to ensure seamless data import back (see above Adding a grading item to the grading book).
- Download the Excel spreadsheet from the dropdown menu → Export → Excel spreadsheet. Select the grade(s) to which you intend to add grades and/or feedback. If you want to add feedback, click Export format options and select Include feedback in export. Click Download at the bottom of the page.
- Open the file with Excel and add grades and feedback. You can also modify existing grades in this file. Expand column widths to see the entire title.
- Do not change the order or number of columns.
- Copy the content of Excel including the column headers.
- Return to the grading section of your MyCourses workspace and select Import from dropdown menu→ Paste from spreadsheet from the dropdown menu.
- Paste the copied content into the data text field and click Load grades.
- Identify the user by email.
- Match the grade items.

Importing grades as a CSV file
- First create an empty grade item in the course gradebook to ensure a seamless data import (see above Adding grade item to the gradebook).
- Download the Excel spreadsheet from the Grades dropdown menu → Export → Export Excel spreadsheet. Select the grade(s) to which you intend to add grades and/or feedback. If you wish to add feedback, click Export file options to open and select Include verbal feedback in the file. Then click Download at the bottom of the page.
- Open the file and save it in csv format.
- Use it to add grades and feedback. You can also modify existing grades in this file. Expand the column widths to see the full headers.
- Do not change the order or number of columns.
- On the Grades page of the MyCourses workspace, select Import from the dropdown menu → Import csv file.
- Save the Excel spreadsheet as a CSV file in UTF-8, select encoding and delimiter semicolon for Finnish, comma for English.
- Choose Identify user by email address Column in the file and Personal data fields in Moodle. The grade item titles under the header will show your Excel file column headers. Here you must select the modified grade items so that they are imported into the corresponding columns in MyCourses.
- Transfer grades
Note:
- Although there are multiple grade items in the CSV file, you do not need to import them all at once
- When saving documents containing student information outside online environments, such as on your own computer, you must be particularly careful about security and privacy. Delete the saved file from your computer as soon as possible.
- By selecting Force import, data will be imported even if recent changes have been made to grades in MyCourses.
- The added grades will then appear in the assessor's report on a brown background, which means the grades have been manually overridden. To see the feedback, click the pencil icon next to the activity title.
Transferring grades to Sisu using a csv file
You can transfer the course total grade to Sisu with a csv file. The file includes fields for first name, last name, student number, grade, credits, assessment date, the language of the performance record and a comment field.
Step-by-step transfer:
- Open grades dropdown meny → Export → from the dropdown menu Sisu CSV Export
- Select only Course total to be included (no other assessment items).
- and set the course credits, default completion language of and assessment date.
- In Export format options - From Grade export display tipe select Real or Letters. If you have grades defined by the grade scale, select Letter and remove the selection from Real.
- You can set one default language or a specific number of credits for all students. If you need different languages or number of credits for different students, choose the most common and open the exported CSV file in Excel for necessary changes before importing to Sisu. The same applies to credits.
- → Download


Pass/fail
- If you want to use the pass/fail scale and edit the thresholds, do so via the Letters. It is important to use the correct format when importing scales into Sisu. For example: Pass, Fail, Hyv., and Hyl. are correct. Use a full stop (.) after Hyv. and Hyl.
- Open Grades → Grade Letters → Edit.
- Grade letter 1 → Change A to Pass or Hyv.: and set the percentage required to pass the course, e.g., 60%, if the student needs to achieve 60% of the points to pass the course.
- Grade letter 2 → Change to Fail or Hyl.: and set the percentage to 0%, if the student fails the course until they achieve 60% of the points.
- Download the file, select Export format options Grade export display types Letters and unselect Real → Download.
- Now you can use Pass/Fail grades in the export.
- See Method 2: Modifying grade boundaries for how modified grades are displayed to students.
Notes:
- The column names in the CSV file are named according to Sisu's requirements. Do not change the names or delete any columns from the file.
- You can upload the CSV file as many times as you need.
- If you have difficulty with accent marks (ä, å, ö) when opening the CSV file, see the instructions on how to open a UTF-8 file in Excel (https://www.accompa.com/kb/answer.html?answer_id=264)
- Further information on Sisu's requirements: Editing and saving a CSV assessment file.
Importing a CSV file into Sisu
- Open Sisu
- Open the upload of the assessment file on the Assessment tab of the implementation by clicking the Import assessment data button.
- A window will appear on the screen.
- Upload the assessment file.
- Once the file name appears, click Submit.
Additional instructions in Sisu Help Course grading in Sisu using CSV file