


MyCourses: Editing the workspace

In short
Editing the course workspace means that you:
- Design and create the course structure to serve your teaching objectives.
- Update and save the course syllabus.
- Add activities and materials to the workspace and set visibility restrictions if needed.
- Create multilingual content if necessary.
- You understand the roles used on the workspace and how the content is visible to different user groups.
Editing the course workspace
To make changes to a workspace in MyCourses, you need to have a Teacher role assigned to that workspace. Click the Edit mode button located in the upper right corner of the top navigation bar.
The course workspace initially only contains the main homepage, which includes the Announcements area and the Syllabus (course description). Add more sections to the course as needed. Design the workspace to support the learning process by making it clearly structured and easy to follow.
You can modify the workspace structure, for example, to be theme-based: give each theme its own section, and add theme-related resources and activities to sections. A week-based structure is well-suited for intensive courses. At its simplest, you can place the course materials in one section and the activities in another.
You can import activities, and materials - or the whole course structure - from your previous course workspace. See Importing content from another workspace. In some cases, your course workspace has the previous course content imported, allowing you to start editing it right away.
You can add a short introduction covering the course topic, structure, and timeline, and possibly a personal introduction as the course instructor, to the course front page.
You can add a header image to brighten up the workspace: open Settings in the Main course page (course top navigation) → Course summary files and course header image.
Name the sections and activities informatively.
How to create a multilingual workspace? Read instructions here: MyCourses: Multilingual workspace | Aalto University
| Structure according to activities or content types: | Structure progressing according to chronology or course themes, for example: |
|
|
Updating syllabus (the course description)
Note! For the syllabus to be visible to students, the teacher must open and save it.
The Syllabus provides essential course information directly from Sisu. Located in the upper right corner of the workspace, the syllabus is accessible to all users on the course page and appears in MyCourses search results. The teacher is responsible for adding implementation-specific details to the course description.
Click the Edit button next to the Syllabus to open it. Fill in the desired fields, such as clarifications to the schedule, course content, or assessment methods, and to save, press Update syllabus.
If you do not see the Edit next to the Syllabus button:
- Ensure that you are logged into MyCourses and that you have a Teacher role in the course workspace. (Only a teacher can see the Edit mode button in the upper right corner, or the Participants tab.)
- Check that the course workspace has been created based on the Sisu information.
Note! Information coming from Sisu can only be modified in Sisu.
If you wish to include information about the exam retake possibility, you can add it, for instance, in the fields "Elaboration of the evaluation criteria and methods, and acquainting students with the evaluation" or "Details on the schedule."

Importing content from another workspace (course reuse)
You can easily import (copy) content from your previous MyCourses workspaces. If you have the Teacher role in both workspaces, you can import either all content or select specific content to import. You can also import groups and groupings, but participants cannot be imported from another course.
- Open the Main course page of the course workspace where you want to import content to. In the navigation row, click More and select Course reuse from the menu.
- On the next page, select Import.
- You’ll see a list of your workspaces. Search and select the workspace whose content you want to import → Continue.
- Select the items you want to include in the import, such as Import activities and resources, and Include groups and groupings if you want to import your own groups structure. Don’t import the question bank or content bank if you don’t need them. Click → Next.
- The Question bank refers to Quiz task questions.
- The Content bank refers to H5P questions.
- Then select the items to be imported from the Activities and resources list and click Next. Announcements are not necessary to include, as they are already available in all workspaces.
- When your import settings and selections are correct, click Next -> Perform import.
- Resources and activities will be imported into the corresponding section of the new workspace as they are arranged in the original one. You have the flexibility to reorganise the content. Refer to the instructions on adding, editing, and reordering sections.
Read more:

Adding and editing sections
The left navigation menu is composed of sections, activities, and resources created within the workspace.
A section is a a page where you can add activities and resources. You can add as many sections as you need; only the first section is ready in the workspace. Activities and resources added to a section appear in sequence in the workspace's left-hand navigation menu.
Plan how you want to organise the content of your course: for example, by themes or progressing weekly. At its simplest, you can keep all the resources in one section and the activities in another; however, note that this structure does not support the chronological progression of the course and can be difficult to navigate if the course has many assignments.
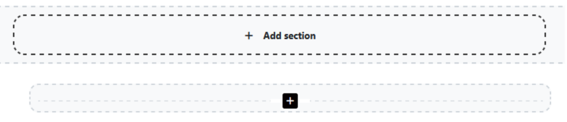
Add section
Note! You can add a new section only from the Main course page!
- Enable Edit mode (in the top right corner)
- Open the Main course page. Click the + Add section button at the bottom of the page. The newly created section appears at the bottom of the left-hand navigation in the workspace. The default name appears for the added section ("New section").
- Click pencil icon next to the section title, and name the topic -> Enter.
- From the three dots next to the title, you can open functions. Edit settings open a text editor that allows you to write directly on the section page and also add an image or video if you wish. → Save. You can hide or delete the section from students if necessary.
Subsection
You can add a subsection to a section. Click the + icon in a section, and you will find the Subsection choice under Activity and resource choice.
Reorganising sections
You can rearrange sections and their contents. Open the Course index (left navigation) and choose Collapse all. You can now drag and drop the sections into a new order.
If you want to rearrange activities or resources, choose Expand all from the top, and drag and drop the content.
Bulk actions for activities
Some bulk (mass) actions are available in the workspace. You can move, close/open, hide, delete, or copy activities using mass actions.
- Click the Bulk actions button at the top of the page (with editing mode on).
- Select activities on the page.
- Select an action from the bottom of the page.

Restricting access to sections, resources, or activities
Workspace resources and other content are accessible to all Aalto/Haka logged-in users, but not to users who are not logged in. You can choose to restrict all content to just participants of your own course, for example, section by section. The entire workspace cannot be restricted at once.
Individuals not enrolled in the course do not have access to the activities.
Limiting content to just course students
You can restric access to sections, assignments, or resources in the course workspace based on, among other things, time, role, or group. Restricting access prevents users from opening and viewing the item. The restriction does not necessarily hide the course item completely, but you can use the restriction function to make visibility conditional.
Note! If you restrict a section, it automatically restricts access to all content within that section, eliminating the need to restrict individual content separately.
- Open section → turn Edit mode on → click the three dots icon next to the name of the section, activity, or resources, depending on where you want to add the restriction.
- Edit topic or Edit settings→ Restrict access → Add restriction.
- Choose how you want to restrict access based on role, date, or something else.
When you want to restrict an item to just course students (and teachers), select Role and Student. Teachers will always access all the content.
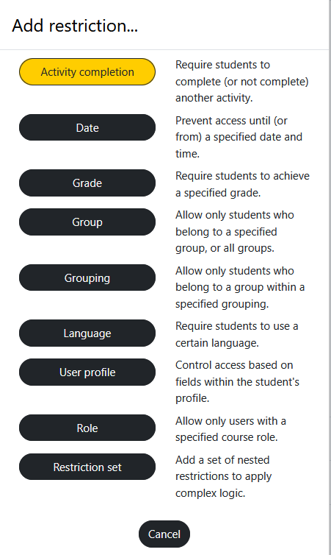
Restricting access with different criteria
Restrictions can be defined based on:
- completion of a previous activity
- date
- grade from a previous activity
- group (create groups to use this)
- grouping (create groups and groupings to use this)
- language
- password
- user profile (e.g. restrict user profiles to only emails containing @aalto.fi)
- role (the Student role restricts access to just students and teachers of your course. With the Teacher role, you can restrict item access to only other teachers of the course)
- restriction set (use multiple restrictions at once, e.g. group + date)
Teachers and students (as well as others) will see the restriction notices and criteria.
Using group restriction in tasks is considered in the grading
If you restrict a task to a specific group, the grading will reflect this, as the task grade will only apply to members of that group. To hide the assessment item from students in the Grades, simply close the task's visibility setting by clicking the eye icon. No further adjustments in the Grades or Gradebook are necessary.