


MyCourses: Using General AI in MyCourses

In short
- AI tools are available in MyCourses.
- CURRENTLY NOT IN USE: Text and images generated by AI can be added directly in the TinyMCE text editor.
- Add Aalto AI assistant to your course.
- AI usage is guided by AI labels, which can be obtained directly from the TinyMCE text editor.
- These ready-made AI labels can be customized to suit individual needs.
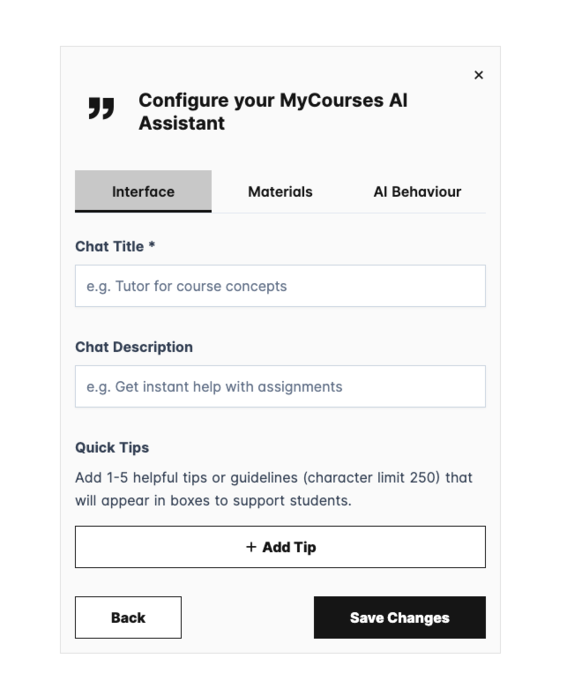
Aalto AI Assistant for course use in MyCourses
The Aalto AI Assistant can be added to a course as a pedagogical tool. You can find the tool in the Activities menu under the name “MyCourses AI assistant.” In the tool, the teacher uploads text as attachments and defines how the AI interacts with students. For example, the teacher can create study material so that students don’t read the files themselves, but instead discuss their content with the AI according to the teacher’s instructions. Read more about creating a MyCourses AI assistant and how you can control its behavior.

CURRENTLY NOT IN USE: Using AI in the MyCourses Editor
This feature has been temporarily disabled due to a confusing user experience. We will review during August 2026 whether the feature can be made available in an understandable way.
The AI feature is available only in the TinyMCE text editor. If you can't find the button in your MyCourses view, go to your profile dropdown menu -> Settings -> Editor settings, and select either the default editor or the TinyMCE editor. The AI tools were implemented in June 2025.
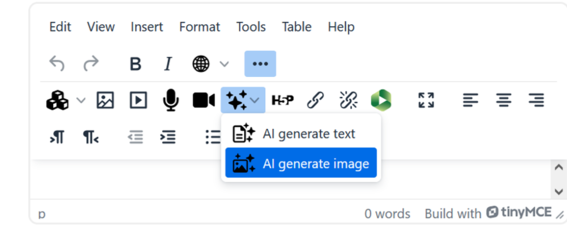
The Create AI content button is located in the text editor of each activity/section. This button allows you to create, translate, and proofread text, as well as create images directly in MyCourses. Currently, the tool is available only to teachers.
- Click the Create AI content button and choose whether you want to create text or images. Enter your prompt in the next pop-up window.
- Click Create text or Create image. Image creation may take longer than text.
- If you are satisfied with the generated text, click Add to insert it into the MyCourses text editor. You can also refine your prompt and click "Regenerate".

AI Images
When working with images, click Next to view the image description or adjust its size by selecting Custom size. Save, and the created image will be copied into the MyCourses text editor.
The Create AI content feature can be used to easily create multilingual course content. By translating text with AI, you can efficiently copy and paste it into the corresponding mlang filters. As in the example, if you want to use the same image for both language versions, you can leave the image outside the mlang filters.


AI Usage Labels / AI Labels
This feature is available only in the TinyMCE text editor. If you can't find the button in your MyCourses view, click on your profile dropdown menu -> Settings -> Editor settings, and select the default editor or TinyMCE editor.
Add a label using the text editor
The AI label component button is located in the text editor of each activity/section. This button enables you to add pre-made labels that inform students how AI usage is allowed or restricted within the activity or section. You can also include pre-made links to general AI resources at Aalto or the Aalto AI assistant.
- Click the arrow button to bring up the component chooser.
- You can select a pre-made label. Hover over the label name to view a preview of the label. If you're satisfied with the default settings, click the arrow on the right to add the label to your page.
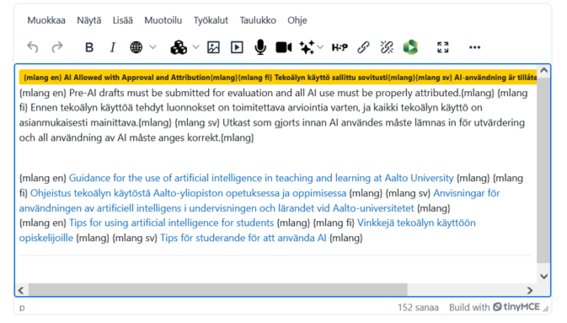
- By default, all labels are available in three languages: English, Swedish, and Finnish.


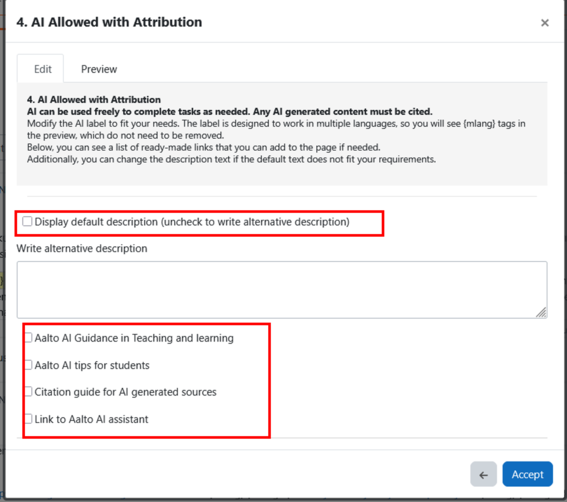
Modifying AI Usage Labels
You can modify pre-made AI labels to better suit the needs of your course.
- Select the description you want to edit.
- Click Display default description (uncheck to write alternative description) to remove the checkmark.
- You will receive a Write alternative description text field where you can write a description for the label. Your alternative description will be displayed below the label instead of the default description.
- You can provide students with ready-made Aalto guidelines:
- Guidelines on AI use in teaching and learning at Aalto University
- Tips for students on using AI
- Scientific referencing: AI sources
- Aalto AI assistant
- Preview: In the preview view, you can see the label, description, and links in a multilingual version. If you write your own description, you can use {mlang} tags to provide text in multiple languages. If you don't use {mlang} tags, the text will be visible in all languages.
- Accept the settings and return to the text editor.
- Finally, save the settings for the entire activity or resource.