


MyCourses: Assignment activity

In short
- You can assess and provide individual feedback on assignments.
- The work submitted by a student is visible only to teachers.
- You can use the Turnitin tool to check for plagiarism and detect AI-generated text in written work.
- Assignments can be submitted in groups. First, create groups and groupings in the workspace.
- For peer assessment, use the discussion forum, FeedbackFruits, or Workshop activities.
Assignment activity settings
An assignment is the most commonly used activity. With the assignment activity, you can provide instructions related to the assignment, add submission dates, choose file formats and grading methods. The assessment can be text feedback or you can use an assessment rubric.
Step-by-step instructions for adding an assignment activity:
- Open Add an activity or resource +icon.
- Select Assignment from the Activities tab.
- Give the assignment a clear name, description/tasks, and submission instructions. You can add files such as instructions or additional material.
- Availability:
- Must be submitted by the date that appears in the calendar. Late submissions are possible.
- Final cut-off date for submissions, after which submissions are not possible. This deadline is not listed in the calendar. Students can edit their submissions up until this date.
- Submission types:
- Students can submit files or online text. You can restrict the number of files or the word limit of online text and define acceptable file types if necessary.
- Feedback types:
- You can provide feedback to students as text, file, audio, or video. You can also annotate PDF documents directly within the document by choosing Annotated PDF in the Feedback types -> Annotate PDF.
- Submission settings:
- You can define whether students need to confirm the submission and set additional attempts (these are usually not necessary).
- Group submission settings:
- Assignments can be submitted on a group basis. Note that individual submissions will not be possible then.
- Feedback and assessments are conducted for the entire group at once and are made available simultaneously to all group members.
- NOTE: Groups and groupings must be created first, and both must be included in the assignment settings for the group assignment to work properly. See Groups and groupings.
- Notifications:
- can be set to send a message to teachers' emails regarding submissions. The message is sent to everyone with a teacher role in the workspace.
- Grade:
- Assignments are graded either on a point system or on a scale. In points, give the maximum grade (the default is 100, but you can change it).
- You can set a grade to pass. Grades under the passing limit show red on the grading summary.
- Grading method: Simple direct grading allows you to select a grade from a scale or assign points to each student. Grades are immediately visible to students once they are saved. Additionally, you can create an assessment rubric. Read more about assessment rubrics.
- Anonymous submission and grading: The identities of students and grader can be hidden. You can reveal names and grades after grading.
- With the marking workflow, you can give a stage to marking phases and release the grades simultaneously to all students.
- Completion conditions:
- Like all activities and resources, assignments can use progress tracking. Read more about progress tracking
- Turnitin plagiarism plugin settings:
- Turnitin is available directly within the assignment activity.
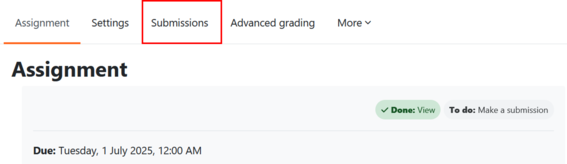
- Student responses can be found under the Submissions tab.
Read more:
- Moodle.org: Assignment
- Moodle.org: Using assignment
Group assignment
- An assignment where the whole group (one group member) submits a single joint submission.
- The teacher evaluates and gives feedback to the entire group at once.
- First, create groups and groupings on the main page of the workspace under the Participants tab -> dropdown menu under the Groups section. In the Create groups automatically section, you can also add groupings simultaneously. Note! You always need a Grouping for the group task to work.
In the task settings, select Group submission settings -> Yes. Select also the Grouping.
Note! Once the group assignment is enabled, the submission settings cannot be changed.
Note: If you encounter an error message with the group task, ensure that grouping is enabled on the Participants page under the Groups section, and that grouping is also enabled in the assignment settings under Group submission settings. Select "Yes," then choose the grouping you created. Students must be members of a group to submit their work. The error may also occur if some students in the course have not been assigned to a group.
Note! Always separate task activities for individual and group tasks!
Note! Do not publish or make task submissions visible to others without permission.
Read more
- Groups and groupings SISÄINEN LINKKI!
- Moodle.org: Group submission settings
Assessing assignment submissions
You can find students' submissions listed on the Submissions tab. You can filter the view by the respondent's name or the submission's evaluation stage. Note that the filter remains active for that assignment even in the next sessions. The filter selections can be cleared with Clear all.
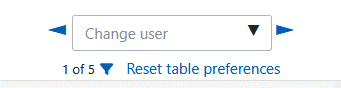
You can see the submission and assess the student by selecting Grade from the three dots in the Grade column on a student´s row. When you have graded one student´s submission, you can navigate to another submission using Change user and the arrow keys to switch to another user from the top menu.
On the submissions page from the top menu, you can enable Quick grading, which opens the grade boxes in the Grade column. You can input (in points) or select grades from the options (in scales) for multiple students at once. Choose from the bottom of the page whether you want to notify the students immediately and save grades.

Publishing the assessment simultaneously to all students (staging the assessment process)
Method 1. Hide the column for the specific assignment in the gradebook during assessment: on the Main course page, open the Grades tab, from the Grader report, open the menu, and choose Gradebook setup -> behind the three dots, hide the column. When all the grading is completed, make the grades visible to students.
Method 2. Stage the assessment process by opening the assignment settings in Assessment and selecting Use marking workflow -> Yes. Workflow process means that the submission initially has the stage 'Not marked'. The other stages of assessment are: In marking, marking completed, in review, ready for release, and released. Not all stages need to be used. The stage can be changed for each response individually or for multiple at once. When the stage 'Released' is selected, the grading is visible to the student.
Tips for assessing tasks and providing feedback
- You can provide audio or video feedback using the tools in the feedback editor.
- Support process writing: Grant additional submission attempts (i.e., multiple submission versions and history) in the task settings under Submission settings.
Read more:
- Moodle.org: Assignment
- Moodle.org:Assignment settings
- Moodle.org: Marking (grading) workflow
Rubric for assessment
An assessment rubric is a versatile, clear, and effective tool for assessing student performance. Criteria and scoring are defined for different aspects of the assignment. Using an assessment rubric improves the transparency of the assessment and helps students understand the basis of their it. It can also speed up the teacher’s assessment work.
Creating an assessment rubric in assignment settings
- In the Assignment settings under Grade -> Grading method select 'Rubric' as the evaluation method -> Save and display.
- After saving, it opens the Advanced grading page. Select Define a new grading form from scratch. You can also create a rubric from a template or use one you have created previously.
- Add the criteria by which the students’ performance will be evaluated. Criteria can include e.g. Quality of content, Writing style, or Presentation of information.
- Define the levels:
- You can define several rating levels for each criterion, describing performances of different quality levels. For example, you can define levels such as 'Excellent', 'Good', 'Satisfactory', and 'Poor'.
- Write a description in each level and define the scores. Note! Always start the scores from zero.
- You can add new criteria by clicking Add criterion or copying the first criterion using the duplication icon next to it, which will also copy the level names and scores. Criteria can be edited.
- Save the rubric once you have defined all the criteria and levels.
Assessing:
- When students have submitted their assignments, use the rubric to evaluate the student’s submission by selecting levels for each criterion.
- Calculating grades: MyCourses automatically calculates the student’s grades based on the rubric and provides the final grade.
Additional settings and tips
- Feedback: You can add individual feedback to specific criteria and the overall performance, helping students understand the reasons for the assessment.
- Reusing the rubric: You can save the rubric and use it later in other tasks or share it with other teachers.
- Publishing the rubric : You can publish the rubric to students in advance so they can see which criteria are used for the assessment and focus on the most important aspects.
Read more:
- Moodle.org: Rubrics
Anonymous grading in the Assignment activity
Anonymous grading allows the teacher to grade submissions so that students’ names are hidden during the grading process. This supports fair assessment and helps reduce possible bias in grading.
Enable anonymous grading
- Add a new Assignment or open an existing assignment and select Edit settings.
- Find the Grade section in the settings.
- Select Anonymous submissions.
- Save the changes.
Anonymous grading should be enabled before students submit their work..
Instructing students
Tell students that the assignment will be graded anonymously. If the assignment is submitted as a file, students must be instructed not to include their name in the file or in the file name.
You can use the following text, for example:
This assignment will be graded anonymously. Do not include your name, student number, or any other identifying information in the submission or file name.
Grading submissions
- Open the Assignment activity.
- Select View all submissions.
- Students’ names are not visible during grading. MyCourse creates a unique number for each student, which is not the same as the student number.
- Give the grade and feedback as usual.
Reveal identities after grading
When grading is complete, the names must be revealed so that they are also visible in the Grades section. The names can be revealed from the Assignment navigation menu by selecting Reveal student names.
Revealing identities cannot be undone, so do this only after grading is complete.
Tracking student progress
You can track students' progress in the workspace using the activity completion feature. Completing an individual task or resource can be a simple "yes or no" (done or not done). Activity settings can be set to show how it appears as completed. For simple items such as a PDF document, progress can be marked as complete when a student opens the file. For assignments or other activities, tracking can be set up to monitor submissions or grades received.
Completion criteria can indicate to students what tasks are expected of them and also, in what order. The teacher can quickly see if a student has not submitted tasks or opened documents. Progress can be tracked in all activities and resources.
You'll find the report on students' activities on the Main course page → Reports → Activity completion.
Students will see their progress as balls in the left navigation and also as a completion mark next to the activity.
Activating completion tracking
Two things must be active for progress tracking:
- Course level tracking is enabled. By default, it is on, but if necessary, the teacher can activate completion tracking in the workspace Settings -> Completion tracking→ Enable completion tracking → Yes. You can also add 'Show activity completion conditions' by selecting Yes.
- Mark the activity completion settings in the specific activity or resources settings.
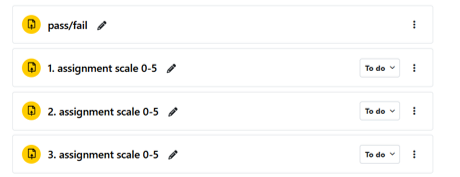
Setting multiple activities at once
- On the Main course page, open More tab -> Course completion -> in the dropdown menu next to Course completion seggings, choose Bulk activity completion.
- Select the activities you want to bulk edit, e.g., all assignment activities.
- Click Edit at the top (or bottom) of the page to open the settings list. Depending on the type of activity, completion requirements vary.
- Select the tracking method: manual (students check the box in the workspace when they are ready) or conditional; the activity is marked as completed when conditions are met.
- Repeat steps 2 and 3 if changes are needed (can also be used to remove settings).
Read more:
- Moodle.org Activity completion settings
- Moodle.org: Using activity completion